Why Your Pool Filter Lid Blew & Cracked Your PVC Plumbing
Filter lid blew like a rocket and cracked your PVC? We explain why it happens, how we repair the damage, and what we do to keep your pool filter safe next time.
When a Pool Filter Lid Blows Like a Rocket
We recently got a call from a customer — let’s call her Karen — who was shaken up after her pool filter lid blew straight off. She’d just installed a new top and clamp on her sand filter (the “giant egg” style Pentair filter), turned the system on, and boom — the lid launched, hit the canopy above her equipment, then crashed back down and cracked a PVC return line clean in half.
When homeowners call us with this kind of problem, we usually see the same pattern: a new lid or O-ring, a clamp that “seems” tight but isn’t fully seated, rising filter pressure, and then sudden separation. In Karen’s case, the lid itself survived, but the falling lid broke plumbing that now had to be cut and re-plumbed before she could safely run her system again.
We walked her through what likely happened, how we’d repair the PVC, and what we always do to prevent a repeat. Let’s break that down so you can avoid the same mess in your own backyard.
What Actually Makes a Pool Filter Lid Blow Off?
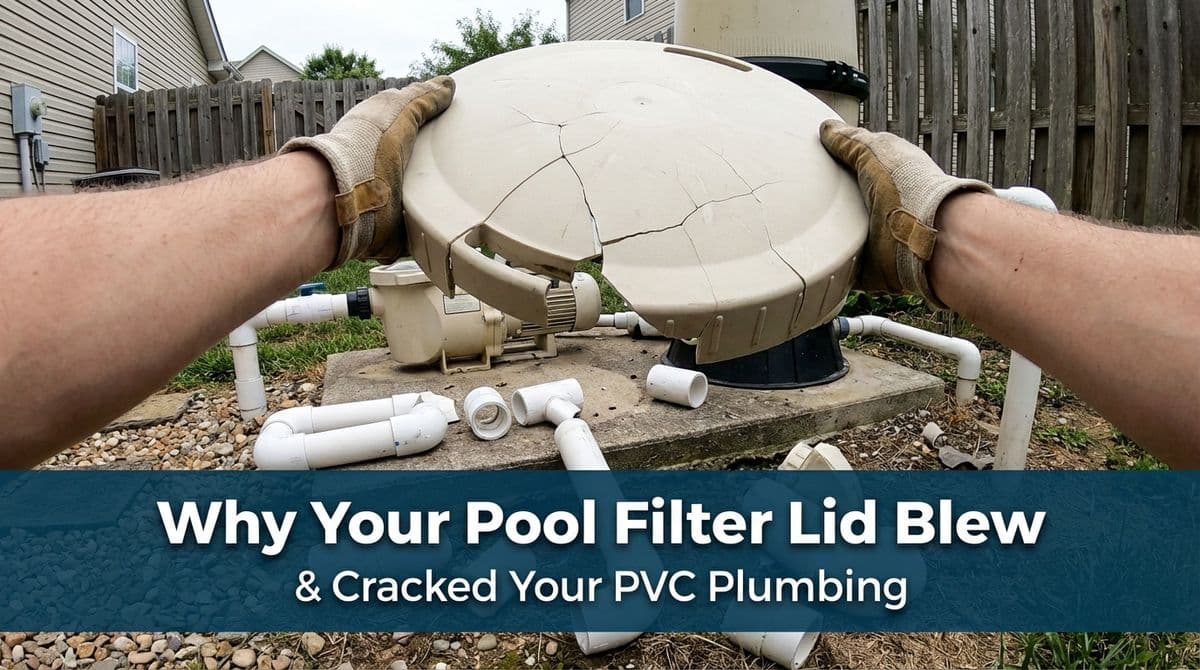
From what Karen described, and from the photos she texted us, we were dealing with a Pentair single-clamp tank filter — tan, egg-shaped, with a metal band around the middle. These filters rely on three things to stay safely sealed under pressure:
- A clean, undamaged tank lip (top and bottom halves)
- A properly sized, lubricated O-ring or gasket
- A clamp band that’s fully seated all the way around and evenly tightened
In her case, the clamp ring was new, the lid was new, and the O-ring had just been replaced. The problem wasn’t the parts — it was that the ring wasn’t fully cinched and seated. When the pump came on, pressure built up inside the filter tank. Because the clamp wasn’t locked down, the tank halves separated just enough for the pressure to “launch” the lid.
Sometimes a loose clamp just causes a leak. Other times, like Karen found out, if it’s tight enough to hold for a moment but not truly locked, pressure can build and then release violently.
Why the PVC Plumbing Took the Hit
The lid isn’t light, and when it’s driven by 15–30 PSI of pressure, it turns into a projectile. For Karen, the lid shot up, hit the canopy overhead, and then came straight down on a vertical PVC line beside her filter, snapping it in half.
We see this all the time:
- Cracked return lines or suction lines
- Broken unions or Jandy valves
- Damaged heaters or pumps from falling lids
Even when the filter tank survives, the plumbing usually doesn’t. That’s why, when we come out to fix something like this, we’re not just replacing PVC — we’re making sure the filter itself can’t repeat the stunt.
Basic Safety Checks Before You Touch Your Filter
Whenever a homeowner tells us they want to try putting a lid back on themselves, we walk them through a few non‑negotiable safety steps first. If you’re going to work on a filter, start here:
- Shut the pump off at the breaker. Don’t just rely on the timer or automation; turn off power so the pump can’t kick on mid-job.
- Relieve all pressure. Open the air relief valve on top of the filter and watch the pressure gauge drop to zero before loosening anything.
- Inspect the tank halves. Look for hairline cracks, warping, or chipped lips where the O-ring sits. If damaged, we don’t reuse that tank.
- Check the gauge. A stuck or broken pressure gauge can hide dangerous pressure buildup. If it doesn’t move, we replace it.
If any of that makes you nervous, that’s where we step in. We’d rather come out and spend a few minutes doing it right than have you standing next to a pressurized time bomb.
Clamp Styles: Not All Filter Lids Work the Same Way
When Karen was describing her equipment, she kept calling it “the big egg.” That’s a common Pentair-style tank with a single band clamp. Other filters use different systems, and we adjust our approach slightly for each:
- Single-band clamp (like Karen’s): One metal ring goes around the entire middle of the filter, tightened with a single nut or bolt. We make sure the ring is evenly seated in the groove all the way around before final tightening.
- V-clamp or spring clamp: A metal clamp with a special latch. These must be seated correctly in the V-shaped grooves; if they’re cocked or misaligned, they can let go under pressure.
- Multi-bolt band: Several bolts around the ring. We tighten these in a star pattern, like lug nuts on a tire, to keep even pressure.
Whenever we’re working on a filter, we double-check clamp alignment from multiple angles. If we can slide the band by hand or see any gap between the band and the tank lips, it’s not ready.
Signs Your Clamp or O-Ring Need Attention
We used Karen’s visit not just to fix her broken PVC, but to go over a quick checklist we think every pool owner should know. If you see any of these, it’s time to have us out or replace parts:
- Persistent drips at the tank seam even after tightening the clamp
- Cracked, flattened, or brittle O-ring when you remove the lid
- Rusty or stretched clamp hardware that doesn’t tighten evenly
- Uneven gap where the two tank halves meet
- Sudden higher filter pressure than normal after cleaning or reassembly
When we service a filter, we pull the O-ring, clean the groove, apply a thin layer of silicone-based lube, and inspect the clamp hardware. If anything looks questionable, we recommend replacement on the spot rather than risking a failure later.
How We Repair the Cracked PVC (and Prevent a Repeat)
On Karen’s call, she specifically asked if we could bring PVC with us so we wouldn’t have to reschedule. That’s exactly how we handle these jobs. We show up with a variety of pipe sizes, fittings, and couplers so we can rebuild whatever that flying lid decided to break.
Our basic process looks like this:
- Assess and isolate. We inspect all nearby pipes, valves, and unions to make sure there’s only one break and no hidden cracks.
- Cut out the damaged section. We use clean, square cuts so new fittings glue up properly.
- Dry-fit new plumbing. We position new pipe and fittings so they’re supported and not putting stress on the filter or pump.
- Prime and glue. We use appropriate primer and PVC cement, then allow proper cure time before pressurizing.
- Re-seat and tighten the filter lid. This time, we align the tank lips, seat the O-ring, install the clamp, and tighten it to manufacturer specifications.
- Restart and test. We slowly bring the system back online, bleed air, check for leaks, and watch the pressure gauge.
We also take a minute to show the homeowner how the clamp should look and feel when it’s truly secure, so they’re not guessing next time they need to service the filter.
When to Call Us Instead of DIY
We love when homeowners want to learn their equipment, but there are a few moments when we suggest you step back and let us handle it:
- The filter lid has ever blown off or tried to
- You see cracks in the tank itself
- The clamp won’t sit evenly no matter what you do
- You’re not comfortable working around pressurized equipment
- Nearby PVC is cracked, leaking, or wobbling
If you’re in our service area and your filter lid has popped, leaked, or made you nervous, we’re happy to come out, repair any PVC damage, and put everything back together safely. We’ve walked plenty of folks like Karen through that “giant egg” filter, and we’d much rather you call us once than have to rebuild half your pad after a second blow-off.